The biggest difference between regular makeup and cosplay makeup, that is lift-up taping.
It wouldn’t be exaggerated to say so.
You don’t see someone taping on their faces regularly, although there are some naughty people putting adhesive plasters on them.
I frequently get asked about lift-up taping during makeup lessons.
So this time, I will introduce the methods and the types of taping to answer the questions that everyone may want to ask!
It is a must for those from beginners to experts!
The Advantages of Lift-up Taping
First let me answer for the question “First of all, why lift-up taping?”
Regularly, makeup is a technique of how to show your original face beautifully. In other words, it all depends on your ordinal one.
Cosplay makeup, on the other hand, is a way to recreate a totally different facial structure from yours, such as those of the 2D characters or those of celebrities.
If you put a makeup normally, your original facial structures get emphasized, and in result, it can’t be resembled to those characters well.
“Then why don’t we change our facial structures physically?”
That is a technique of taping.
If you have lift-up tapes, you can physically and freely change your jawline or eye shapes, or even conceal your wrinkles!
It must be a worth learning technique!
Taping Techniques
I will explain it with my own face.

I use a ring light and the front camera on iPhone 8 for this shooting.
My eyelids are thick and hidden double, or is even single.
I apply nothing but put colored contact lenses.
My eyebrows are all shaved off.
The lift-up tape I use this time is a white one so that it is visible to everyone.
Now, let’s see how these will be changed!
Making a Jawline Sharper
Humans’ jawlines are infinitely various, however, an ideal one is defined as “the reversal egg shape.”
It would be ideal to be much sharper for making it look like the one of characters from anime or manga.
I will introduce taping with which the ideal will be the real!
Here it is:
The way to lift your jaw from the area next to the ears to the overhead.
Only this can make a big difference as you can see the right side and the left side of my face.
The right side is with taping, and the left is without it.
This technique is used by most cosplayers.
“The cheek meat is my problem…”
“My face is originally in a round shape…”
It works well for those who have these concerns!
Concealing the nasolabial folds
The concept that never exists in 2D characters: Nasolabial folds
They are the folds from the sides of your nose to your mouth.
There are some people whose folds originally tend to stand out, but even if not, they are troublesome that would naturally come out as you get old.
You would look older only by the folds standing out.
An effective technique for the folds is this!
Bring your cheek up barely from the outside of it, through under your ear, and lift it to the back.
As a result, this is how it looks from the front.
Take a look closer to the mouth!
On the right side of my face, the folds near the mouth are concealed, and the corner is lifted.
This is also a basic technique.
It would be good to add it to your list.
Making Slanted Eyes
Next, let’s do taping for changing the shape of your eyes.
As a preparation, I have already made double eyelids with eyetapes.
The one I used is “Prud’or Natural.”

Let’s change the shape of your eye physically, which is actually very easy.
Drag your skin from your temple to the back.
Originally my eyelids are comparatively in parallel.
I did not drag my skin too tightly this time, but you can do so if you cross-dress like a man with narrow eyes.
Making Droopy Eyes
Let’s make a droopy eye on the other side of my face.
Attach a tape from the edge of where a wig hides your face and drag it to below the ear.
You can make it droopier if you tape from a point closer to the eye, but it is better not too, otherwise the taping can be openly shown.
This is how it looks from the front.
The right side is slanted, and the left is droopy.
Comparison After Applying Makeup
After applying slanted eye makeup and droopy one with masculine crossdressing, I put a wig.
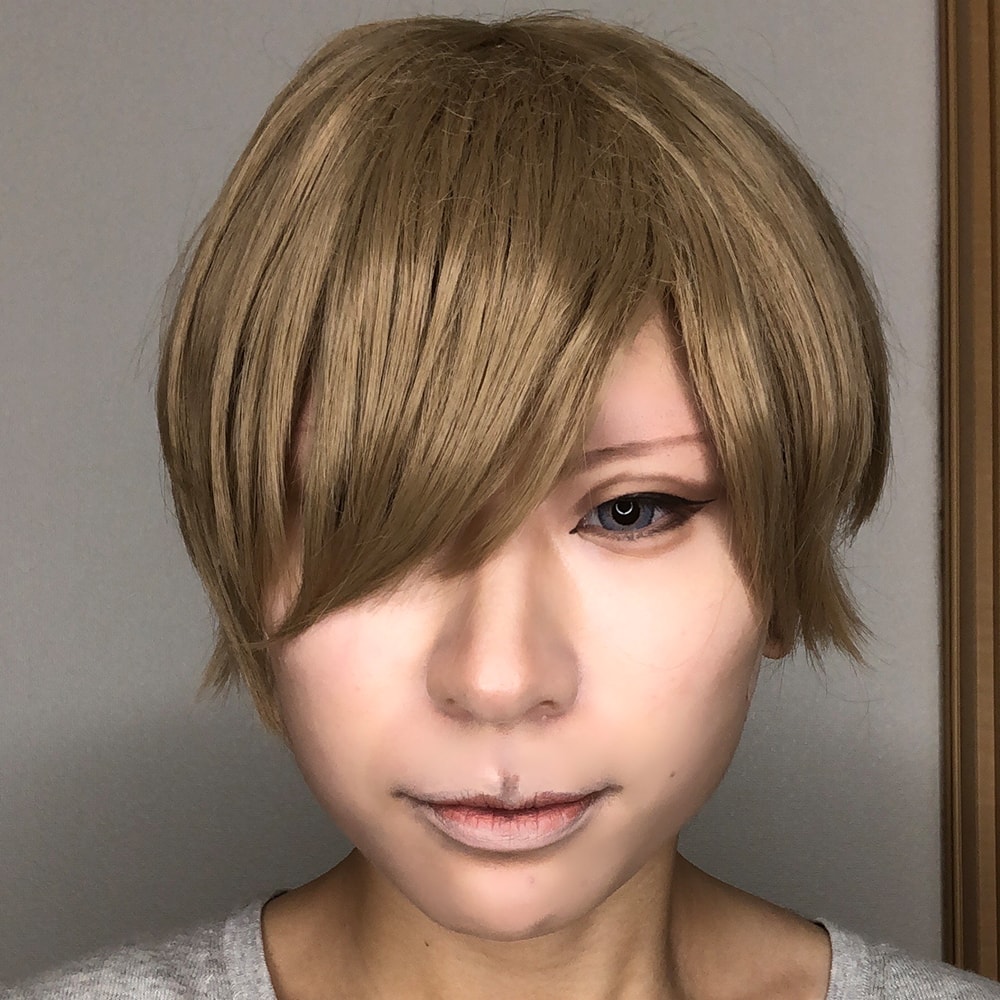
<Tap for a larger image>
I adjusted the positions of my eyebrows to both higher and lower.
How to Make Big Eyes
The next technique is useful for cosplaying a girl character: making a vertically big eye.
Here is the taping looks.
Although the eye makeup is as it is, the difference of the eye size is obvious.
It is simply fixing the eye opened, but it does change to this.
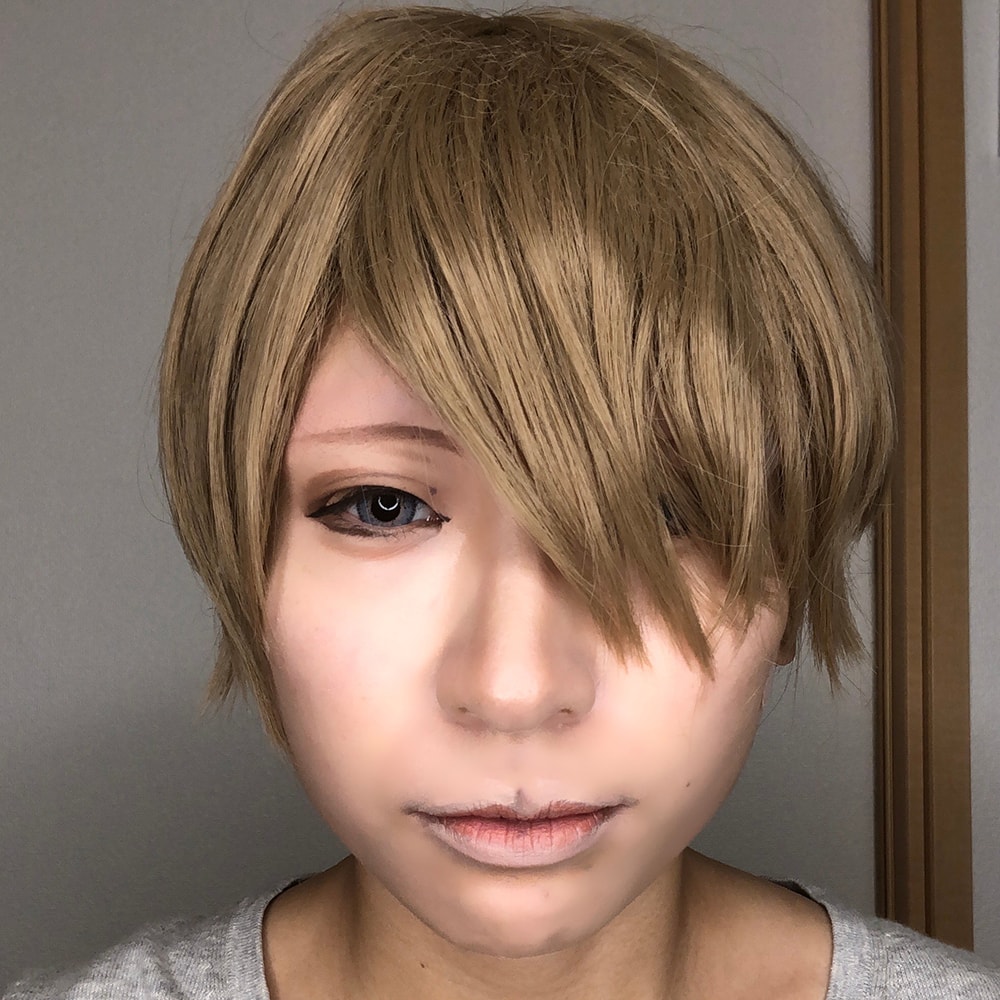
Comparison after Applying Makeup
Next, combining with the taping for big eyes, I applied another makeup which suits well for girl characters.
The tips of eyeliner are basically the same.


<Tap for a larger image>
I adjusted the position of my eyebrows to higher on the one side and lower on the other side as you can see.
Once you apply fake eyelashes on your own lashes with this, it would make your eyes look much bigger!
Recommended Taping for Cosplay Makeup
“Liftup Tape” from Asssist Wig

This is the stuff that you might say: “This is what it is for cosplaying! All I need is this…!”
It is a long tape rolled in one, so you can cut in a length you need and apply by taking off the release paper.
・Specialized for cosplaying, therefore gentle for skin
・Lift your skin firmly
・Un-noticeable for photo shooting
・Difficult to apply after taking off the release paper
・Need a scissor to cut
・Expensive
Beige, White Tape

The tape from Nichiban, which is famous therefore needless to say.
It is originally for a medical purpose, including fixing gauze patches and closing a wound.
This is a type made of paper-like material and has no release paper.
It can be cut easily by hands.
・Gentle to skin
・No need a scissor to cut
・Un-noticeable for photo shooting
・Narrow width
・Weak adherence by sweat
Waterproof Film

I posted a link about the one produced by Nichiban here, however, there are more kinds of waterproof films produced by various companies, such as Top Value.
this is transparent, and more importantly,is really un-noticeable!
The stretchiness is also outstanding.
・Un-noticeable for photo shooting
・Various kinds of the width
・Stretchy, therefore, easy to lift up your skin
・Tend to hurt the skin when taking it off
・Not easy to apply after taking off the release paper
・Need a scissor to cut
How to Choose a Tape
First of all, please prioritize the compatibility with your skin.
The facial skin is much more sensitive than the skin on the body.
It is essentially not supposed to be a place to apply a tape.
We apply a tape for a long period of time on the place, so please have a little try to apply it first, then make sure if there is no blister nor thin skin peeled away after taking it off.
A Useful Item to Have
Let me introduce a useful item along with tapes.
”Hagasu no Tasuketai”(a Taping Remover)

This is a dedicated remover for lift-up tapes, produced by Assist Wig.
This is how to use this.
rolling the remover over and over on the tape.
Then the liquid come out of it, so apply it on the tape firmly and take off the tape gently.
This reduces a risk to hurt your skin much lower.
Kizu Power Pad: Spot Type (from a Japanese adhesive plaster series)

It would be ideal to put 5 of it into a cosmetic pouch…!!
This is the most invisible and fastest for healing, in case the tape hurts your skin or is peeled off.
Anyway, if you feel “Ouch!” then please apply this immediately!
If you have an extra, you can give one to your friend in case of necessity.
Summary
This time, I introduced the basic methods and the types of taping.
However, people’s faces are all different, and the way of taping you need to follow may change, depending on what character you want to cosplay.
Along with checking the compatibility of taping with your skin, I recommend practicing apply tapes for a few times.